Hi there! If you're reading my neglected little blog, then you've no doubt realized that I'm not much of a blogger, especially given the fact that I haven't created a new post in about 2 years. :) Nowadays, I'm mostly found over at ravelry. I'm known as Mariblue there.
However, I have some great news to share!
Two of my patterns have been published in a fun little knitting book called "Vampire Knits", by Genevieve Miller. It's a beautiful book, with some gorgeous photography, and fabulous patterns all about Vampires, and even a few werewolves to boot!
It's set to be released in just a few days, and I'm so excited about it!
Saturday, September 11, 2010
Thursday, December 18, 2008
A Christmas Snowflake

I am literally snowed in today. At first it was just thick, fat, luscious snowflakes falling lazily to the ground. Now, overnight, it has worked itself up into quite a frenzy; that thin, powdery kind of snow that swirls in all directions before finally settling to the ground. But it doesn’t stay there long. The wind picks it up and sends it skittering across the ground, drifting into the roads, and sometimes briefly forming small snow tornados that scatter quickly, but are amazing to see nonetheless.
Yes, snow brings its problems: the cold, the ice, the near impossible traffic conditions. My kids can get bored rather quickly on snow days due to the almost certain kind of monotony in the never ending snow.
However, today is special because it’s the first snow day, and that makes it magical. Snow days at our house mean hot chocolate. Snow days mean family movie time, and playing board games around the dining room table. It means reading books aloud to my children and cuddling up in blankets and looking at the lights on the Christmas tree. I love it. Every moment.
And today I have also been working on my very own snowflake design. It crochets up very quickly. As I’m snowed in, I used the smallest hook I could find at the moment, which is a size G/4.00MM hook. The finished snowflake ended up being about 3.5 inches across. Of course, the beauty of these small crocheted snowflakes is that you can use whatever size hook and crochet thread you like—the many combinations of thread colors and hook size ensure that each snowflake you make will be a little different from the other, just like real snowflakes.
You can download the pattern for Ravelry.
Here's the link: A Christmas Snowflake.
Enjoy!
Monday, October 6, 2008
Some Things I've been working on...
Well, here I am, completely shameless about the fact that I have not posted any knitting news on here in so long--I am so not the blogger type! I have several journals and diaries from when I was a kid that are half empty-yet there are a few treasured memories in there which make me glad for attempting to document parts of my life. The point is that I like to try to keep a journal/blog, even though I'm not very good at it. :)
I have been working on several designs lately, some of which are for a possible knitting book based on the Twilight Series by Stephenie Meyer.
I. Love. Twilight. Love. Need I say more?
There are three patterns I have finished that will be submitted for possible publishing soon. First, a little tote bag called the "Twilight Tote" that will feature intarsia charts with little quotes from the books--"Be Safe", "La Tua Cantante", and "Stupid Shiny Volvo Owner". In addition, there will be a girl from Ravelry who plans to submit some "Team Jacob", "Team Edward" charts. Two of the charts feature simple embroidery on them as well. The bag has a ribbon threaded through eyelet holes at the top, along with a picot edging.
The next pattern is called the "Vegetarian Wrap", and it is meant to depict the color change that a vegetarian vampire's eyes go through, from gold, on down to black. There will also be a volturi version that goes from bright red to black. The wrap has a simple diagonal lace pattern, and looks really great with the color changes that occur in it.
The last pattern is for the Wolf Pack, and it is neither knit or crochet but a twisted leather cord. If you've read the books (and I assume you have if you have read this far), then you'll remember in Eclipse when Bella notices that Jacob has a small leather anklet around his ankle, to help him carry his clothes when he is in his wolf form. That's the inspiration for my "Wolf Pack Anklet."
I haven't posted any photos here on my blog, but if you're on ravelry, you can see them here, here, and here. I am not sure when the book will actually be published, as it is still in its infancy, but will try to post here as soon as I have that knowledge!
In addition to the above, I have a baby hat pattern that I've been meaning to share, and will post the pattern here and on ravelry within the next month or so. Here's a picture:
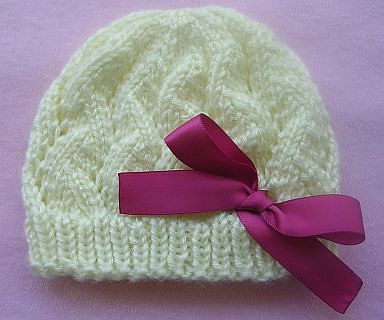 It turned out really cute, and I can't wait to share the pattern!
I have been working on several designs lately, some of which are for a possible knitting book based on the Twilight Series by Stephenie Meyer.
I. Love. Twilight. Love. Need I say more?
There are three patterns I have finished that will be submitted for possible publishing soon. First, a little tote bag called the "Twilight Tote" that will feature intarsia charts with little quotes from the books--"Be Safe", "La Tua Cantante", and "Stupid Shiny Volvo Owner". In addition, there will be a girl from Ravelry who plans to submit some "Team Jacob", "Team Edward" charts. Two of the charts feature simple embroidery on them as well. The bag has a ribbon threaded through eyelet holes at the top, along with a picot edging.
The next pattern is called the "Vegetarian Wrap", and it is meant to depict the color change that a vegetarian vampire's eyes go through, from gold, on down to black. There will also be a volturi version that goes from bright red to black. The wrap has a simple diagonal lace pattern, and looks really great with the color changes that occur in it.
The last pattern is for the Wolf Pack, and it is neither knit or crochet but a twisted leather cord. If you've read the books (and I assume you have if you have read this far), then you'll remember in Eclipse when Bella notices that Jacob has a small leather anklet around his ankle, to help him carry his clothes when he is in his wolf form. That's the inspiration for my "Wolf Pack Anklet."
I haven't posted any photos here on my blog, but if you're on ravelry, you can see them here, here, and here. I am not sure when the book will actually be published, as it is still in its infancy, but will try to post here as soon as I have that knowledge!
In addition to the above, I have a baby hat pattern that I've been meaning to share, and will post the pattern here and on ravelry within the next month or so. Here's a picture:
It turned out really cute, and I can't wait to share the pattern!
Tuesday, March 4, 2008
Miniature Easter Baskets
 While in the kitchen this morning making breakfast, I heard some noises out
back. I finished flipping the pancakes, and peeked out of the curtains to take a
look. Hmm…nothing. Nothing but luscious fat snowflakes, lazily drifting down to
blanket the ground with another layer of snow.
“That’s odd,” I said to myself.
“What’s odd, Mommy?” My oldest said, rubbing at his tired eyes as he walked
into the kitchen.
“I thought I heard something out back,” I replied.
He sat down at the table, and as I began to pour the orange juice, I heard the
sound again. My son’s eyes grew wide as he turned to look at me, and asked,
“Mommy what was that?”
“Something scurrying about outside, I think. Do you want to go wake up your
sister and take a look?”
Off he ran, and the next few moments were filled with a flurry of boots and coats,
hats and mittens. Ready for the investigation, my daughter opened up the kitchen
door and the kids slowly poked their heads outside, when finally my daughter
shrieked in delight. “Mommy, look! Look what we found!” And I, smiling, went out
to look….

It appears that the Easter Bunny has come early this year for a tiny pre-Easter treat. These little crocheted Easter baskets are so cute.
The baskets are about 1 ½ inches tall, and 2 inches across, not including the shell edging. Taking into account the length of the handle, the total height is about 3 ½ inches. They are just large enough to hold a handful of jellybeans, or one Easter egg. Crocheted in continuous rounds, these miniature baskets are fast and easy to complete!
This pattern is also now available as a ravelry pdf download here.

Friday, January 11, 2008
Diagonal Slant Dishcloth Pattern!

I'm so excited to say that my pattern for a dishcloth, called "Diagonal Slant" was chosen as the January dishcloth for the yahoo group Just Dishcloths. Anne, the group leader, held a small contest for December and January for original dishcloth designs, and mine was one that got picked!
The pattern for "Diagonal Slant" is listed as the January 2008 pattern at the Just Dishcloth Group.
June 2008 I've noticed that there has not been any activity on the Just Dishcloth group for quite some time, so I have decided to make my pattern available as a free ravelry download. You can find the pattern here.
Have fun!
Wednesday, December 19, 2007
3D Crochet Lace Ornaments
Let's not discuss the irony of the fact that the first few patterns I share on a blog titled "Blogless Knitting" are actually crochet patterns!


This work is licensed under a
Creative Commons Attribution-Noncommercial-Share Alike 3.0 Unported License.
In my search for Christmas ornament patterns, I ran across Judy Gibson’s pattern for her beautiful knitted lace ball, and inspiration struck. I immediately sat down and designed these crocheted Christmas ornaments, and am very pleased with the results. They are quick to make, and only need to dry over night before they are ready for hanging on your tree!
These patterns are also available as a ravelry download. You can find it here.
Materials Needed: Size 3 crochet Cotton; 5.00 MM (H) crochet hook; balloon (one for each ornament); craft glue (or some kind of starch for stiffening); spray glitter, if desired, scrap yarn.


This work is licensed under a
Creative Commons Attribution-Noncommercial-Share Alike 3.0 Unported License.
Never...
I always swore I'd never have a blog. Not that I don't like them. I enjoy a good knitting blog as much as the next person (knitter). I just thought I'd never be one of those knitters, because I'm generally a quiet person with very little to say out loud to people I do not know.
But then I have this problem. Like never being able to follow a knitting pattern without putting my own little twist on it. Then the dreams started. You know, knitting dreams. Knitting dreams that are so vivid , dreams in which I have created something so beautiful that I wake up all excited and ready to design something. Then reality sets in, and I realize what I've dreamed up is utterly ridiculous. However, it's fueled my imagination and I'm off and running.
I'm still considering myself relatively blogless, but I'll be posting knitting patterns, and the occasional crochet pattern, that I've created. Let's see where my imagination takes me...
Subscribe to:
Posts (Atom)